


Are you gearing up for a Kotlin interview and want to ensure you're well-prepared? In this article, EPAM Anywhere’s certified technical interviewer and senior software engineer Nikita Shevtsiv will provide a comprehensive list of 20 essential Kotlin interview questions along with detailed answers, empowering you to excel in your next Kotlin interview.
By exploring these Kotlin interview questions and answers, you'll not only gain a deeper understanding of Kotlin and Android but also boost your confidence in tackling a technical interview. So, let's dive in and equip you with the knowledge and insights necessary to impress interviewers and secure that dream Kotlin position.
save your time on job searching
Send your CV and we'll find the best-matching job for you among our open positions while you get ready for your Kotlin developer interview
1. What’s the difference between RxKotlin and Kotlin Coroutines?
RxKotlin and Kotlin Coroutines are two different approaches to handling asynchronous programming in Kotlin. Here's a breakdown of their differences:
- Paradigm: RxKotlin is based on the Reactive Programming paradigm, while Kotlin Coroutines are based on the concept of structured concurrency and sequential programming with suspending functions.
- Syntax: RxKotlin uses the Observer pattern and provides a rich set of operators that allow you to compose and transform streams of data. It uses constructs like Observables and Observers to handle asynchronous events. Kotlin Coroutines, on the other hand, introduce new language keywords and constructs like Suspend and CoroutineScope to write sequential code that can be suspended and resumed at specific points. This makes asynchronous code look more like traditional synchronous code.
- Concurrency model: RxKotlin is designed for handling streams of events and supports multiple concurrent streams. It allows operators to combine, transform, and manipulate these streams. Kotlin Coroutines focus on structured concurrency, allowing you to write asynchronous code that can be easily structured and managed. Coroutines provide structured cancellation and exception handling, making it easier to manage resources and handle errors.
- Backpressure handling: RxKotlin has built-in mechanisms for handling backpressure, which is the ability to control the rate at which data is emitted from a source to prevent overwhelming downstream consumers. It allows operators like buffer, throttle, and debounce to manage backpressure. Kotlin Coroutines, on the other hand, do not provide built-in backpressure handling. Instead, you can use libraries like Flow or Channel from the kotlinx.coroutines library to implement backpressure manually.
- Library ecosystem: RxKotlin is part of the larger RxJava ecosystem and provides a wide range of operators and extensions for handling asynchronous operations, reactive streams, and other related concepts. Kotlin Coroutines, on the other hand, are a native part of the Kotlin language and standard library, making it easier to integrate and work with other Kotlin features. Kotlin Coroutines also have a growing ecosystem of libraries and frameworks built specifically for coroutine-based programming.
In summary, RxKotlin is a reactive programming library that focuses on handling streams of events and provides a rich set of operators for composing and transforming those streams. Kotlin Coroutines, on the other hand, provide a more structured approach to asynchronous programming, making it easier to write sequential code that can be suspended and resumed. They offer features like structured concurrency, cancellation, and exception handling. The choice between RxKotlin and Kotlin Coroutines depends on the specific requirements and design preferences of your project.
2. What types of layouts in Android development for creating screens do you know?
In Android development, there are several types of layouts that you can use to create screens and arrange UI components. Here are some commonly used layouts:
- LinearLayout: LinearLayout arranges UI components in a single row or column. You can specify the orientation (horizontal or vertical) and use gravity and layout weights to control the positioning and sizing of the components.
- RelativeLayout: RelativeLayout allows you to position UI components relative to each other or to the parent layout. You can specify rules such as aligning to the top, bottom, left, or right of another component. RelativeLayout is flexible and useful for complex UI designs.
- ConstraintLayout: ConstraintLayout is similar to RelativeLayout but with more powerful features. It allows you to define constraints between UI components, such as aligning edges, centering, or creating chains of components. ConstraintLayout is highly flexible and helps create responsive UI designs.
- FrameLayout: FrameLayout is a simple layout that positions UI components on top of each other, similar to layers. It is commonly used for simple UI designs or as a container for fragments.
- GridLayout: GridLayout arranges UI components in a grid of rows and columns. You can specify the number of rows and columns and set the alignment and spacing between components.
- TableLayout: TableLayout arranges UI components in rows and columns, similar to a table. It allows you to define rows and cells and set properties for each cell, such as spanning multiple columns or rows.
- CoordinatorLayout: CoordinatorLayout is a flexible layout that’s designed to coordinate the behavior of its child views. It provides features like handling scrolling effects, nested scrolling, and coordinating animations between UI components.
- AppBarLayout: AppBarLayout is specifically designed to work with the Toolbar and provides scrolling behaviors, such as collapsing and expanding the toolbar when scrolling content.
These are some of the most commonly used layouts in Android development. Each layout has its own purpose and features, so choosing the appropriate one depends on the specific requirements and design of your application's screens.

3. What are the advantages and disadvantages of MVP, MVVM, and Clean Architecture architectural patterns in Android app development?
MVP (Model-View-Presenter):
Advantages:
- Separation of concerns: MVP separates the responsibilities of the UI (View) from the business logic (Presenter) and data (Model). This makes the code more modular and maintainable.
- Testability: The separation of concerns in MVP allows for easier unit testing of the Presenter and Model components, as they can be tested independently from the UI.
- Code reusability: The Presenter can be reused across different UI implementations, promoting code reusability.
Disadvantages:
- Complexity: MVP can introduce additional complexity compared to simpler architectures, especially when dealing with complex UI interactions.
- Boilerplate code: Implementing MVP often requires writing additional code, such as interfaces and contract classes, which can increase the overall codebase size.
- Learning curve: Developers who are new to MVP may need time to understand the separation of responsibilities and the communication flow between the components.
MVVM (Model-View-ViewModel):
Advantages:
- Separation of concerns: MVVM separates the UI (View) from the business logic and data (ViewModel), promoting modularity and maintainability.
- Testability: The ViewModel in MVVM can be unit tested independently from the UI, making it easier to write testable code.
- Data binding: MVVM often leverages data binding frameworks, such as Android Data Binding or Jetpack's View Binding, which can reduce the amount of boilerplate code and simplify UI updates.
- Reactive programming: MVVM can utilize reactive programming libraries, such as RxJava or Kotlin Coroutines, to handle asynchronous operations and data flow in a more reactive and declarative manner.


Disadvantages:
- Learning curve: MVVM may require developers to learn new concepts and libraries, especially when working with data binding or reactive programming frameworks.
- Potential performance impact: MVVM, particularly when combined with data binding, may introduce a slight overhead due to the additional layers and event bindings.
- Complexity for simple apps: MVVM might be overkill for simple applications with minimal UI complexity, as it introduces additional components and concepts.
Clean Architecture:
Advantages:
- Separation of concerns: Clean Architecture enforces a clear separation of concerns, with layers representing different responsibilities, such as business rules, data access, and UI.
- Independence from frameworks: Clean Architecture promotes writing business logic and core functionality that is not tightly coupled to specific frameworks or technologies, making it more maintainable and adaptable.
- Testability: By separating the core business logic from external dependencies, Clean Architecture enables easy unit testing of individual components.
- Scalability and maintainability: The modular and decoupled nature of Clean Architecture facilitates easier code maintenance and scalability as the application grows.


Disadvantages:
- Complexity: Clean Architecture introduces additional layers and abstractions, which can make the codebase more complex and potentially increase development time.
- Learning curve: Developers need to understand the principles and concepts of Clean Architecture to effectively implement it.
- Increased development effort: Implementing Clean Architecture may require more initial effort and planning compared to simpler architectural patterns.
- Overengineering for small projects: Clean Architecture might be excessive for small projects with straightforward requirements, as it adds more complexity and development overhead.
Ultimately, the choice of architectural pattern depends on the specific requirements of the project, team expertise, and the desired trade-offs between complexity, maintainability, and scalability. Each pattern has its own strengths and weaknesses, and it's important to evaluate them in the context of your project's needs.
4. What is Dependency Injection (DI) and how can it be implemented in Android applications using the Dagger or Koin library?
Dependency Injection (DI) is a design pattern that allows the separation of object creation and dependency resolution from the usage of those objects. It aims to reduce coupling and improve testability, reusability, and maintainability of the codebase.
In Android applications, DI is commonly used to manage dependencies between components such as activities, fragments, services, and other classes. There are several DI libraries available for Android development, including Dagger and Koin. Here's an overview of how DI can be implemented using these libraries.
Dagger:
Dagger is a popular DI library for Android that uses compile-time code generation to create efficient and optimized dependency injection code. Here are the key steps to implement DI using Dagger.
- Step 1: Define Dependencies: Identify the dependencies that need to be injected into your classes.
- Step 2: Create Modules: Create Dagger modules that provide the necessary dependencies. Modules define the logic for creating and providing instances of dependencies.
- Step 3: Annotate Dependencies: Annotate the dependency fields in your classes with Dagger annotations, such as @Inject.
- Step 4: Create Component: Create a Dagger component interface that specifies the injection targets and defines the dependencies from the modules.
- Step 5: Build and Inject: Build the Dagger component using Dagger's code generation, then use the component to inject the dependencies into the target classes.
Dagger's code generation allows it to create efficient and optimized dependency injection code at compile-time. This leads to faster runtime performance but requires more upfront configuration and a steeper learning curve.
Koin:
Koin is a lightweight DI framework for Kotlin that focuses on simplicity and ease of use. It uses a DSL (Domain-Specific Language) to define and configure dependencies. Here's a simplified overview of implementing DI with Koin.
- Step 1: Define Dependencies: Identify the dependencies that need to be injected into your classes.
- Step 2: Declare Modules: Create Koin modules using the Koin DSL. Modules define how dependencies are created and provided.
- Step 3: Define Dependencies in Modules: Inside the modules, use the single or factory functions to define the dependencies and their creation logic.
- Step 4: Declare Injection Targets: Annotate the dependency fields in your classes with Koin annotations, such as inject().
- Step 5: Start Koin: Initialize Koin in your application's entry point (such as Application class) using startKoin() and provide the defined modules.
- Step 6: Inject Dependencies: Use Koin's inject() function or by inject() property delegate to inject the dependencies into the target classes.
Koin provides a simple and declarative approach to DI in Kotlin. It’s easy to set up and has a gentle learning curve compared to Dagger. However, it may have slightly higher runtime overhead due to its runtime dependency resolution.
Both Dagger and Koin offer powerful DI capabilities, and the choice between them depends on factors such as project requirements, team preferences, and the desired balance between performance and ease of use.
It's worth noting that the implementation details for Dagger and Koin may vary depending on the library versions and configuration options. It's recommended to refer to the official documentation and guides for the specific version that you’re using for more detailed instructions.
5. What are SQLite and Room in Android? How are they used to work with databases in applications?
SQLite is a software library that provides a relational database management system (RDBMS). It is embedded within the Android operating system and is widely used for local data storage in Android applications. SQLite is a lightweight and self-contained database engine that supports SQL queries and transactions.
Room is a persistence library provided by the Android Jetpack components. It is built on top of SQLite and provides an abstraction layer to simplify working with databases in Android applications. Room offers an object-relational mapping (ORM) approach and provides compile-time verification of SQL queries, making it easier to work with databases in a type-safe manner.
Here's an overview of how SQLite and Room are used to work with databases in Android applications.
SQLite:
- Database Creation: To use SQLite, you need to create a subclass of the SQLiteOpenHelper class. This subclass manages the creation and upgrade of the SQLite database. It provides methods to define the database schema and handle versioning.
- Table Creation: SQLite databases consist of one or more tables. You define the table structures and their columns using SQL statements.
- Data Manipulation: You can perform various operations on the SQLite database, such as inserting, updating, deleting, and querying data. SQL statements are used to execute these operations.
- Cursor: SQLite returns query results as a Cursor object, which provides methods to traverse and retrieve data from the result set.
Room:
Room simplifies working with SQLite databases by providing a higher-level abstraction. It consists of three main components.
- Entity: An entity represents a table in the database. You define entity classes annotated with @Entity, which map to database tables. Each entity class represents a row in the table, and its fields represent the table columns.
- DAO (Data Access Object): DAOs provide methods to interact with the database. You define DAO interfaces annotated with @Dao, which declare the database operations like insert, update, delete, and query using SQL or Room-specific query annotations.
- Database: A database is represented by an abstract class annotated with @Database. It defines the entities and their relationships and provides methods to obtain DAO instances. Room generates an implementation of the database at compile-time.
Using Room, you can perform database operations with less boilerplate code compared to traditional SQLite. Room takes care of generating SQL queries, managing database connections, and handling multithreading. It also supports LiveData and Kotlin Coroutines for reactive programming and simplifies database migration.
By abstracting away low-level SQLite operations and providing compile-time safety, Room helps developers write more maintainable and efficient code when working with databases in Android applications.
Overall, SQLite is the underlying database engine in Android, while Room is a higher-level library that simplifies database operations and provides an ORM-like approach to working with databases in Android applications.

6. How can you test Android apps? What tools and frameworks can be used for unit and instrumented testing?
Testing Android apps involves various techniques, including unit testing and instrumented testing. Here's an overview of the tools and frameworks commonly used for testing Android apps.
Unit testing:
Unit testing focuses on testing individual units of code in isolation, such as classes, functions, or methods, to ensure they work as expected. The following tools and frameworks are commonly used for unit testing Android apps.
- JUnit: JUnit is a popular unit testing framework for Java and Kotlin. It provides annotations and assertions for writing and running tests. JUnit tests can be written for Android app components, such as plain Java/Kotlin classes or ViewModel classes.
- Mockito: Mockito is a mocking framework that allows you to create mock objects for dependencies and simulate their behavior during unit tests. It is often used in conjunction with JUnit for creating and verifying mock interactions.
- Robolectric: Robolectric is a framework that allows you to run unit tests for Android apps directly on the JVM without the need for an emulator or a physical device. It provides a simulated Android environment, enabling faster and more isolated unit testing.
Instrumented testing:
Instrumented testing involves running tests on a real or virtual Android device to verify the behavior of the app in a real-world scenario. The following tools and frameworks are commonly used for instrumented testing.
- Espresso: Espresso is a testing framework for creating and running UI tests on Android. It provides APIs for interacting with UI elements, simulating user interactions, and verifying expected behaviors. Espresso tests can be used to validate UI flows and user interactions.
- UI Automator: UI Automator is a testing framework provided by Android that allows you to create tests that interact with multiple apps and system components. It can be used to perform cross-app UI testing, such as verifying inter-app communication or testing system-level interactions.
- MockWebServer: MockWebServer is a library that helps you simulate server responses during instrumented testing. It allows you to mock HTTP responses, set up scenarios, and verify network interactions in a controlled manner.
- Android Test Orchestrator: Android Test Orchestrator is a test runner provided by Android that helps in running instrumented tests. It provides features like test sharding, test ordering, and separating test runs, improving efficiency and test reliability.
- Firebase Test Lab: Firebase Test Lab is a cloud-based testing infrastructure provided by Google. It allows you to run instrumented tests on a wide range of real devices or emulators in the cloud, enabling you to test your app on various device configurations and OS versions.
These tools and frameworks provide a comprehensive suite of testing capabilities for Android app development, allowing developers to cover both unit testing and instrumented testing needs. Choosing the appropriate tools and frameworks depends on the specific requirements of the app, the type of testing, and the desired testing approach.
7. How can you handle and download images from the web in Android apps? What libraries can be used for this purpose?
Handling and downloading images from the web in Android apps involves fetching the image data, managing the download process, and displaying the images in the app's UI. There are several libraries available that simplify these tasks. Here's an overview of the process and some popular libraries that can be used.
Fetching and downloading images:
To fetch and download images from the web, you typically use an HTTP client library to make network requests. Here are some commonly used libraries.
- OkHttp: OkHttp is a widely-used HTTP client library for Android. It provides a simple API for making network requests and supports features like request caching, connection pooling, and handling timeouts.
- Volley: Volley is a networking library provided by Google that simplifies fetching data over the network. It offers a high-level API for making HTTP requests, including image requests, and provides features like request prioritization and caching.
Image loading and caching:
After downloading the images, you need a library to handle image loading, caching, and efficient display in the app's UI. Here are some popular libraries for image loading.
- Glide: Glide is a powerful image-loading and caching library for Android. It supports fetching images from various sources (URLs, local storage, etc.) and provides features like memory and disk caching, image resizing, and placeholder and error handling.
- Picasso: Picasso is another widely used image-loading library that simplifies the process of fetching and displaying images. It offers features like image resizing, caching, placeholder handling, and image transformations.
- Coil: Coil is a lightweight and fast image-loading library for Android. It focuses on simplicity and ease of use, providing features like caching, placeholder support, image transformations, and fetching images from various sources.
- Fresco: Fresco is an image-loading library provided by Facebook. It offers advanced image handling capabilities, including memory and disk caching, image resizing and transformations, progressive loading, and animated GIF support.
These image-loading libraries provide features like asynchronous loading, caching, and memory optimization, which help improve performance and provide a seamless image-loading experience in Android apps.
It's important to consider factors like library features, performance, community support, and compatibility with your project requirements when choosing an image-loading library. Additionally, refer to the library documentation and samples for implementation details specific to each library.
8. What are extension functions in Kotlin? How do they work and how can they be useful in Android app development?
Extension functions in Kotlin allow you to add new functions to existing classes without modifying their source code. They enable you to extend the functionality of classes from external libraries or even core Kotlin classes. Extension functions provide a more concise and expressive way of working with objects, enhancing code readability and reusability.
Here's an overview of how extension functions work and how they can be useful in Android app development.
Syntax and declaration:
To declare an extension function, you define a function outside of any class and prefix it with the class you want to extend, followed by a dot. The class you're extending is referred to as the receiver type. Here's an example of an extension function that adds a formatAsCurrency() function to the Double class:
In the above example, Double is the receiver type, and formatAsCurrency() is the extension function.
Function invocation:
Extension functions can be called in a similar way to regular member functions. Once an extension function is declared, it becomes available on instances of the receiver type. Here's how you can use the formatAsCurrency() extension function:
In the above code, the formatAsCurrency() extension function is invoked on the price variable of type Double.
Usefulness in Android app development:
Extension functions can be highly beneficial in Android app development. Here are a few use cases where they can be particularly helpful.
- Utility Functions: Extension functions can be used to add utility functions to Android framework classes, such as extending the Context class to provide custom utility methods for obtaining resources or performing common tasks.
- View Manipulation: You can extend Android View classes to add custom behavior or convenience methods. For example, you can add extension functions to the TextView class to simplify setting text with formatting or to the ImageView class to simplify image loading and transformation.
- DSL-Like Syntax: Extension functions can be used to create DSL-like syntax, allowing for more expressive and readable code. This is commonly seen in libraries like Anko, which provides extension functions for building UI layouts programmatically.
- Adapter Enhancements: Extension functions can be used to add additional functionality to Android RecyclerView or ListAdapter classes. For instance, you can extend these classes to provide helper functions for updating the list or handling item click events.
Extension functions offer flexibility and convenience in adding functionality to existing classes, promoting code reusability and enhancing code readability. They allow you to write expressive and concise code, reducing the need for utility classes or helper methods scattered throughout your codebase.
9. What are lateinit and lazy in Kotlin? What are the differences between them?
lateinit and lazy are both features in Kotlin that provide a way to initialize variables lazily. However, they differ in their use cases and initialization mechanisms.
lateinit:
The lateinit modifier is used for declaring non-null variables that will be initialized at a later point before they are accessed. It is specifically used for mutable properties, and it’s important to note that lateinit can only be used with var properties (mutable properties).
Key points about lateinit:
- The lateinit modifier can only be used with non-null types.
- The variable must not have an initializer.
- It cannot be used with primitive types (e.g. Int, Boolean, etc.) because they cannot be null.
Usage example:
lazy:
The lazy function is a delegate provided by Kotlin's standard library. It allows you to initialize a variable lazily, meaning it is computed only when it is first accessed, and the computed value is cached for subsequent accesses.
Key points about lazy:
- The lazy delegate can be used with both val (immutable) and var (mutable) properties.
- The variable must be of a nullable type or the delegate must be able to compute the initial value.
- The initialization code block passed to lazy is executed only once, on the first access of the property.
- The computed value is cached and reused for subsequent accesses.
Usage example:
Differences:
- lateinit is used for variables that must be assigned a non-null value at a later point before accessing, while lazy is used for variables that are computed lazily and can be nullable or assigned a value via initialization code.
- lateinit is specifically used for mutable properties (vars), whereas lazy can be used with both immutable (vals) and mutable properties.
- lateinit variables must be initialized before accessing them, while lazy variables are initialized lazily when first accessed.
- lateinit cannot be used with primitive types, whereas lazy can be used with any type.
It's important to note that lateinit and lazy are not interchangeable. They serve different purposes and should be used based on the specific requirements of your code.
10. How can I save and restore the state of activities and fragments in Android when the configuration changes (for example, screen rotation)?
To save and restore the state of activities and fragments in Android when configuration changes occur, such as screen rotation, you can use the following approaches.
onSaveInstanceState() and onRestoreInstanceState():
For Activities:
- Override the onSaveInstanceState() method in your Activity. This method is called before the activity is destroyed due to configuration changes.
- Save the necessary data into the Bundle parameter provided in the onSaveInstanceState() method. You can use putString(), putInt(), putSerializable(), or other similar methods to store data.
- In the onCreate() or onRestoreInstanceState() methods, check if the Bundle parameter is not null to determine if the Activity is being recreated after a configuration change.
- Retrieve the saved data from the Bundle and restore the state of your Activity accordingly.
For Fragments:
- Override the onSaveInstanceState() method in your Fragment. This method is called before the fragment is destroyed due to configuration changes.
- Save the necessary data into the Bundle parameter provided in the onSaveInstanceState() method.
- In the onCreateView() or onActivityCreated() methods, check if the Bundle parameter is not null to determine if the Fragment is being recreated after a configuration change.
- Retrieve the saved data from the Bundle and restore the state of your Fragment accordingly.
ViewModel:
The ViewModel component, part of Android Architecture Components, can be used to persist and manage the state across configuration changes. ViewModels are not destroyed during configuration changes and are tied to the lifecycle of the hosting Activity or Fragment.
- Create a ViewModel class that holds the data you want to persist across configuration changes.
- Associate the ViewModel with your Activity or Fragment using the ViewModelProvider.
- Store and retrieve the data in the ViewModel during the lifecycle of the associated component. The data will be retained even when configuration changes occur.
ViewModels can be particularly useful for managing complex data or retaining data across multiple screens or fragments.
It's important to note that when using either approach, you need to handle the restoration of your data properly and update your UI accordingly. Also, keep in mind that certain types of data, such as open network connections or running background tasks, cannot be persisted using these methods and require different approaches for handling configuration changes.

11. What is Android Jetpack? What components and libraries are included in Jetpack and what benefits do they offer for Android app development?
Android Jetpack is a set of components, tools, and libraries provided by Google to simplify and accelerate Android app development. It encompasses a wide range of features and functionality, covering areas such as UI design, architecture, data management, testing, and more. Jetpack components are designed to work together and address common challenges faced by Android developers.
Some of the key components and libraries included in Android Jetpack are:
Architecture components:
- LiveData: Provides lifecycle-aware data holders that allow you to observe changes in data and update the UI accordingly.
- ViewModel: Helps manage and persist UI-related data across configuration changes by providing a lifecycle-aware ViewModel.
- Room: An SQLite object-mapping library that provides an abstraction layer over SQLite database operations, making it easier to work with databases.
UI components:
- Data Binding: Enables declarative binding of UI components to data sources, reducing boilerplate code and simplifying UI updates.
- RecyclerView: A more flexible and efficient replacement for ListView, offering improved performance and customization for displaying lists of data.
- ViewPager2: A modern version of ViewPager that allows swiping between multiple screens or fragments in a horizontal manner.
- ConstraintLayout: A flexible layout manager that allows you to create complex and responsive layouts easily.
- Navigation: Provides a framework for implementing navigation and handling transitions between different screens or destinations in your app.
Behavior components:
- WorkManager: A powerful and flexible library for scheduling and managing background tasks, such as syncing data or performing periodic work.
- Notifications: A set of tools and APIs for creating and managing notifications in your app.
- Sharing: Simplifies the process of sharing content from your app to other apps or social media platforms.
Data management components:
- Paging: Helps you load and display large sets of data in a more efficient and incremental way, suitable for handling lists or grids.
- ViewModel and LiveData: These components, mentioned earlier, also fall under the data management category.
Testing components:
- AndroidX Test: Provides testing support libraries for writing and executing unit tests and instrumented tests for your Android app.
- Espresso: A testing framework for creating UI tests to automate interactions with the app's user interface.
- Hilt: A dependency injection library that simplifies dependency injection in Android apps and improves testability.
The benefits of using Android Jetpack components include:
- Improved productivity: Jetpack components provide ready-to-use solutions and higher-level abstractions, reducing boilerplate code and development time.
- Enhanced compatibility: Jetpack components are designed to work across a wide range of Android versions, ensuring backward compatibility and easier adoption of new features.
- Lifecycle awareness: Many Jetpack components are lifecycle-aware, automatically handling common concerns like managing data updates or handling configuration changes.
- Modular and independent: Jetpack components can be used individually, allowing you to adopt only the components that are relevant to your project or gradually migrate to Jetpack without rewriting your entire app.
- Official support and updates: Jetpack components are maintained by Google, providing official documentation, support, and regular updates to address issues, introduce new features, and ensure compatibility.
Overall, Android Jetpack simplifies Android app development by providing a robust set of components that handle common tasks, promote best practices, and improve overall app quality and maintainability.
12. What is Material Design? What are the main principles and components of Material Design that can be used in Android applications?
Material Design is a design language developed by Google that aims to create visually appealing, consistent, and intuitive user interfaces across different platforms and devices. It provides guidelines, principles, and a set of design components to help developers and designers create visually appealing and user-friendly Android applications.
The main principles of Material Design are as follows:
- Material: Material Design is inspired by real-world materials and their tactile qualities. It incorporates elements such as depth, shadows, and motion to create a sense of realism and physicality in the digital interface.
- Bold and intentional imagery: Material Design emphasizes the use of bold, high-quality imagery to communicate and engage users. Large and immersive images can be used as backgrounds, headers, or illustrations to enhance the visual experience.
- Meaningful motion: Motion is an integral part of Material Design. It adds fluidity and meaning to interactions, making them more intuitive and appealing. Animations, transitions, and responsive feedback should be used to guide users and provide context.
- Responsive and adaptive design: Material Design encourages the creation of responsive and adaptive interfaces that adapt to different screen sizes, orientations, and input methods. Applications should provide a consistent and optimized experience across various devices and form factors.
- Consistent and intuitive UI: Material Design promotes consistency in UI elements and interactions to enhance usability. It emphasizes clear visual hierarchy, consistent typography, grid-based layouts, and standardized UI components for familiarity and ease of use.
Some of the main components and features of Material Design that can be used in Android applications are:
- Material Theming: Material Theming allows you to customize the visual appearance of your app while maintaining the core principles of Material Design. It enables you to define colors, typography, shapes, and motion styles that align with your brand and create a unique look and feel for your app.
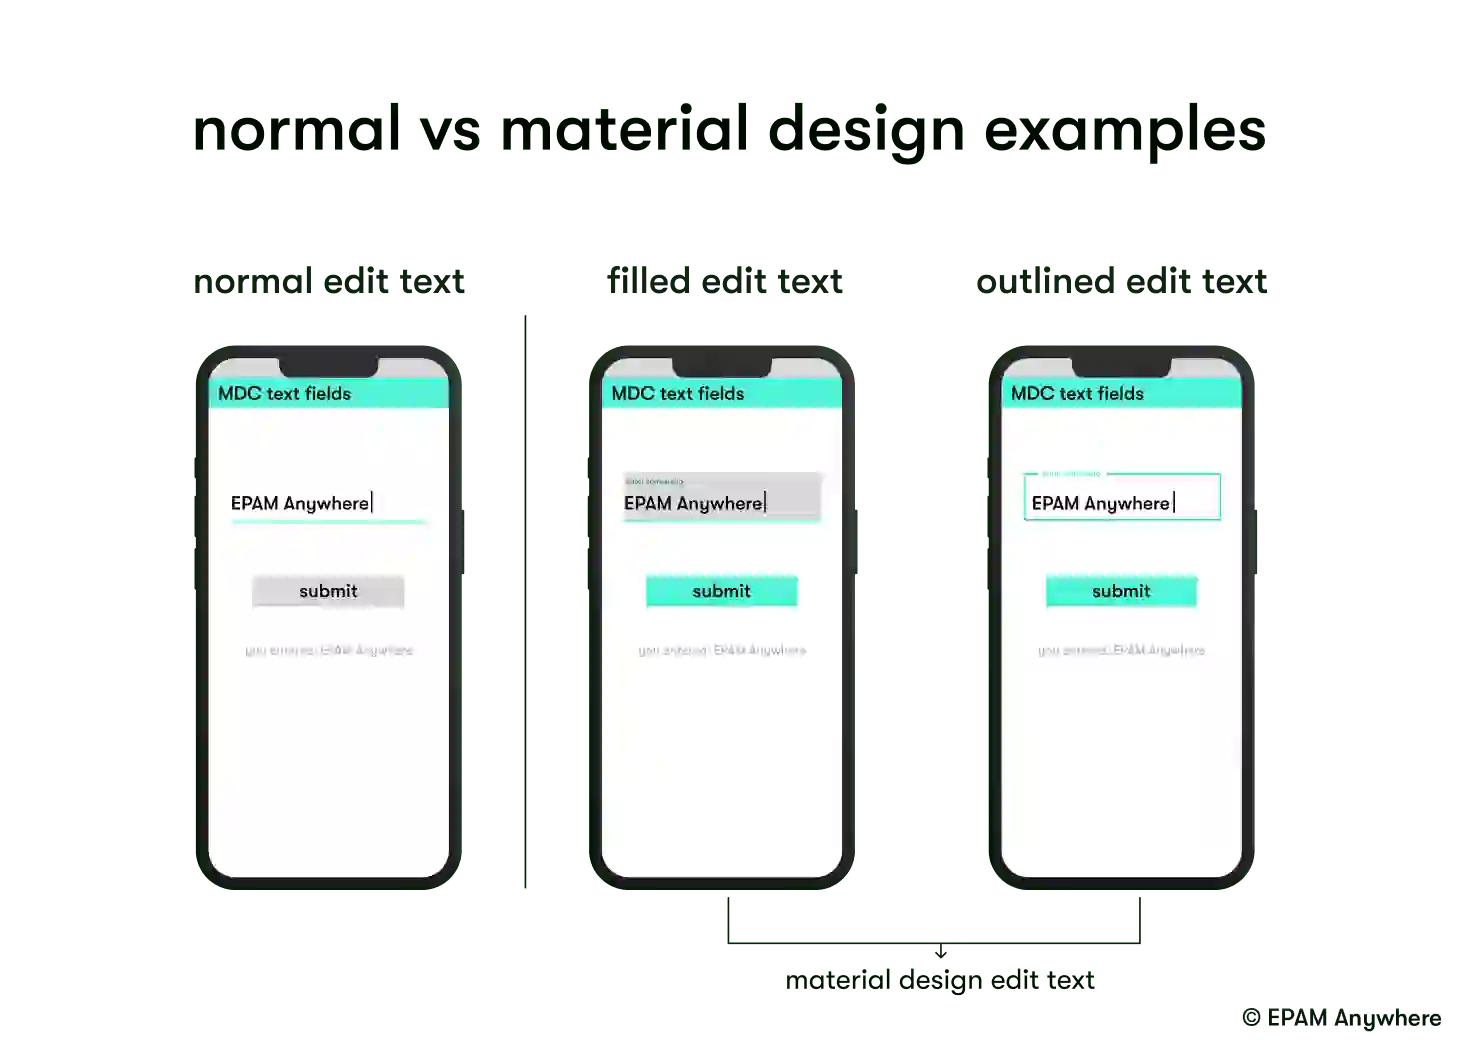
- Material Components for Android: Google provides a library called "Material Components for Android" that offers a set of pre-built UI components following the Material Design guidelines. These components include buttons, cards, dialog, text fields, navigation drawers, bottom sheets, and more. They are customizable and can be easily integrated into your app to maintain a consistent and modern design.
- Floating Action Button (FAB): The Floating Action Button is a circular button that floats above the UI and serves as a primary action trigger. It is commonly used to represent the most important action in an app and is accompanied by motion to provide context and guidance.
- Material Design Icons: Google provides a comprehensive set of icons that follow the Material Design guidelines. These icons are available as vector graphics and can be easily integrated into your app's UI to maintain visual consistency.
- Material Ripple Effect: The ripple effect is a visual feedback that occurs when a user touches an interactive element. It provides a sense of touch response and helps users understand that an element is clickable or tappable.
By incorporating Material Design principles and components into your Android applications, you can create visually appealing, user-friendly, and consistent interfaces that align with modern design standards and provide a pleasant user experience.

15. What are Services in Android? When and how are they used to perform background operations?
Services in Android are components that allow you to run tasks or perform operations in the background without requiring a user interface. Services can be used to perform long-running operations, handle network requests, play music, download files, or perform any other background tasks that don't require user interaction.
Services are primarily used in the following scenarios:
- Background Operations: Services are commonly used to perform tasks in the background that don't need a user interface. For example, you might use a Service to upload files to a server, fetch data from the internet, or perform complex calculations in the background. By offloading these operations to a Service, you prevent blocking the main thread and ensure a smooth user experience.
- Foreground Services: Foreground Services are special types of Services that have higher priority and provide ongoing user-visible functionality. They are used for tasks that require user attention, such as playing music, tracking location, or performing important operations that the user should be aware of. Foreground Services display a persistent notification to indicate their ongoing operation and importance.
- Bound Services: Bound Services allow other components (such as Activities or other Services) to bind to them and establish a client-service connection. Bound Services provide methods and interfaces that clients can use to communicate with the Service and perform operations. This is useful for scenarios where you need to interact with a Service, exchange data, or receive callbacks from the Service.
- Remote Services: Remote Services allow you to interact with a Service running in a different process or even on a different device. Remote Services use interprocess communication (IPC) mechanisms, such as Android Interface Definition Language (AIDL) or the newer AndroidX Binding Library, to enable communication between different components running in separate processes.
Services are a fundamental component in Android for performing background operations and managing long-running tasks. They allow you to offload work to the background, maintain application responsiveness, and provide a variety of functionalities that enhance the overall user experience.
16. What are animations in Android? What types of animations exist and how can they be created and used in applications?
Animations in Android are visual effects or transitions that bring elements on the screen to life. They enhance the user experience by adding fluidity, interactivity, and visual feedback to user interactions and state changes in an application. Animations can be used to create smooth transitions between screens, highlight UI elements, provide visual cues, or simply add an engaging and polished feel to the app.
Android provides several types of animations that can be created and used in applications:
- Property Animations: Property Animations allow you to animate the properties of UI elements, such as position, size, rotation, transparency, or color. They offer fine-grained control over animations and can be applied to any object that has properties that can be changed over time. Property Animations are based on the ValueAnimator and ObjectAnimator classes.
Example of scaling an ImageView using Property Animations:
- View Animations: View Animations (also known as Tween Animations) are simpler animations that can be applied to Views. They allow you to animate common properties of Views, such as alpha (transparency), scale, rotation, or translation. View Animations are defined using XML files or programmatically using the Animation class.
Example of fading in a View using View Animations defined in XML:
- Transitions and Scene Animations: Transitions and Scene Animations are used to animate the visual changes between different states of a user interface, such as moving from one screen to another or transitioning between layouts. They provide automatic and seamless animations for adding, removing, or changing Views in a layout.
Transitions can be defined using XML files or programmatically using the Transition API. They allow you to animate changes in common properties like visibility, position, size, and more.
Example of transitioning between two layouts using Scene Transitions:
- Animated Vector Drawables: Animated Vector Drawables allow you to create vector graphics that contain animated properties. They can be used to animate the properties of vector-based images, such as changing shapes, colors, or rotations. Animated Vector Drawables are defined using XML files and can be used with the AnimatedVectorDrawableCompat class.
Example of animating a vector drawable:
Animations in Android can be created and used using XML files or programmatically through the Animation and Animator classes. XML files provide a declarative way to define animations, while programmatically creating animations gives you more flexibility and control over the animation process.
Animations can be triggered in response to user interactions, events, or changes in the application state. They can be applied to Views, Layouts, Drawables, or custom UI elements to create visually appealing and interactive experiences.
By incorporating animations into your Android applications, you can enhance the user experience, provide visual feedback, guide user attention, and make your app feel more polished and engaging.
17. What is a BroadcastReceiver in Android? How is it used to receive and process system and user messages?
In Android, a BroadcastReceiver is a component that allows your application to receive and respond to system-wide or application-specific messages, broadcasts, or events. It acts as a listener for broadcasted Intents and allows your app to perform specific actions or respond to events even when the app is not actively running.
Here's how BroadcastReceiver works and how it can be used:
- Broadcasts and Intents: In Android, different system events, such as battery low, network state changes, device boot completed, or custom events, are broadcasted as Intents. Intents are messages that carry information and can be sent to all interested components within the system, including your application. A BroadcastReceiver listens for specific Intents and responds accordingly.
- Registering a BroadcastReceiver: To receive broadcast messages, you need to register your BroadcastReceiver with the Android system. This can be done statically in the manifest file or dynamically at runtime using the registerReceiver() method.
- Implementing onReceive(): Once a broadcast Intent matching the registered criteria is received, the onReceive() method of your BroadcastReceiver is invoked. This is where you define the actions to be taken when the broadcast is received. The onReceive() method receives two parameters: the Context and the received Intent.
Example of a BroadcastReceiver implementation:
Declaring in Manifest or registering dynamically
To use a BroadcastReceiver, you have two options:
- Declare in Manifest: If you want your BroadcastReceiver to receive broadcasts even when your app is not running, you declare it in the manifest file along with the specified Intent filters.
- Register dynamically: If you want your BroadcastReceiver to be active only while your app is running, you can register it dynamically in your code using the registerReceiver() method.
BroadcastReceivers can be used to listen for various system and application events, such as device boot completed, network connectivity changes, incoming calls or SMS, alarms, battery level changes, and more. They allow your app to react to these events and perform specific actions or initiate further processing.
BroadcastReceivers are a powerful mechanism in Android for responding to system and user messages or events. They enable your app to be notified of important events and take appropriate actions, enhancing the functionality and responsiveness of your application.

18. What is the difference between ListView and RecyclerView?
ListView and RecyclerView are both UI components in Android used to display lists of data, but they have some differences in terms of functionality and performance.
ListView
ListView is an older component introduced in the early versions of Android. It displays a vertically scrollable list of items in a single column. Each item in the list is a View object, and the ListView creates and maintains a view for each item in the list. ListView uses an Adapter to provide data to the list and handles the recycling of views to optimize memory usage.
However, ListView has some limitations, especially when dealing with complex or dynamic lists. One of the main drawbacks is the inefficient recycling of views. In a ListView, only a limited number of views are created to fit the visible portion of the list, and as the user scrolls, these views are reused for different items. This recycling mechanism helps in memory efficiency, but it also introduces some complexities when dealing with different view types or dynamic data changes.
RecyclerView
RecyclerView is a more advanced and flexible replacement for ListView introduced in the Android Support Library and later integrated into the AndroidX library. It offers improved performance, flexibility, and extensibility compared to ListView. RecyclerView was designed to address some of the limitations of ListView and provides better control over the presentation and behavior of list items.
RecyclerView separates the concerns of data management, item views, and layout management. It uses a combination of the following components:
- RecyclerView: The main container that manages the scrolling behavior and recycling of views.
- LayoutManager: Responsible for laying out the items in different ways, such as linear, grid, or staggered grid.
- Adapter: Handles the data binding and creates the appropriate ViewHolder objects for the items.
- ViewHolder: Represents an item view and its associated data. ViewHolders are recycled and reused as the user scrolls.
The key benefits of using RecyclerView over ListView are:
- Improved performance due to more efficient view recycling mechanisms.
- Better flexibility in defining item layouts and handling different view types.
- Support for animations and item decorations.
- Easier integration of user interactions, such as swipe gestures or item selection.
Overall, RecyclerView is recommended for most scenarios, as it provides more control, better performance, and improved flexibility compared to ListView. However, if you are working on a simple list with a fixed number of items and don't require advanced features, ListView can still be a viable option.
19. What is RecyclerView Pooling and how can it be used to efficiently display large lists of data in a RecyclerView?
RecyclerView pooling, also known as view recycling, is a mechanism provided by the RecyclerView component in Android that allows the efficient reuse of item views when scrolling a large list of data. It helps optimize memory usage and improves the performance of scrolling and item creation.
In RecyclerView, instead of creating a new view for each item in the list, a limited number of views are created and reused as the user scrolls through. When an item view goes off-screen, instead of destroying it, the view is detached from its current position and added to a view pool. When a new item needs to be displayed, the RecyclerView checks the view pool for a recycled view that can be reused. If a suitable view is available, it is bound to the new item's data and displayed. This process significantly reduces the overhead of creating and destroying views, resulting in a smoother scrolling experience and efficient memory usage.
To enable view recycling and improve performance in RecyclerView, you can follow these steps:
- Implement a RecyclerView.Adapter: Create a custom adapter that extends the RecyclerView.Adapter class. This adapter will be responsible for binding data to the views and managing view recycling.
- Override the onCreateViewHolder() method: In this method, create a new ViewHolder and inflate the item view layout. The ViewHolder represents an item view and holds references to its child views.
- Override the onBindViewHolder() method: Here, bind the data to the views of the ViewHolder. This method is called when a recycled view needs to be updated with new data.
- Override the getItemViewType() method (if needed): If your list has multiple view types, you can override this method to provide a unique identifier for each view type. This helps RecyclerView correctly recycle views of the same type.
- Override the getItemCount() method: Return the total number of items in your list.
By following these steps, RecyclerView will automatically handle view recycling, view creation, and binding of data to views. You don't need to manage view recycling explicitly. RecyclerView handles it behind the scenes, efficiently reusing views as the user scrolls.
To further optimize the performance and memory usage, you can also configure the RecyclerView's LayoutManager to use an appropriate layout strategy. For example, if you have a large list, you can use LinearLayoutManager with a vertical orientation for efficient scrolling. Alternatively, you can use GridLayoutManager or StaggeredGridLayoutManager for grid-like or staggered layouts.
In summary, RecyclerView pooling or view recycling is a key feature that allows the efficient display of large lists of data. It minimizes view creation and destruction overhead by reusing views, resulting in improved scrolling performance and reduced memory consumption.
20. What are ProGuard and R8 in Android? How are they used to compress and optimize code in release builds of an application?
ProGuard and R8 are tools used in the Android build process to compress, optimize, and obfuscate code in release builds of an application. They help reduce the size of the APK file and improve the overall performance and security of the app.
ProGuard
ProGuard is a popular open-source optimization and obfuscation tool for Java applications, including Android apps. It performs various code-level transformations, such as removing unused code, inlining methods, and renaming classes, methods, and variables to make the code more compact and less readable.
ProGuard's main functions are:
- Optimization: It analyzes the code and removes unused classes, fields, and methods, thereby reducing the size of the application. It also performs optimizations like inlining methods and removing unnecessary instructions to make the code run faster.
- Obfuscation: ProGuard renames the classes, methods, and variables in the codebase to make it more difficult for reverse engineers to understand and modify the code. Obfuscation helps protect intellectual property and prevent unauthorized access to sensitive information.
To use ProGuard, you need to enable it in your app's build.gradle file by adding the necessary configuration. When you build a release version of your app, ProGuard is automatically executed, and the resulting APK file contains the optimized and obfuscated code.
R8
R8 is a new code shrinker and optimizer introduced by Google as part of the Android Gradle Plugin. It replaces ProGuard as the default code shrinker starting from Android Gradle Plugin 3.4. R8 offers similar functionality to ProGuard but with improved performance and better integration with the Android build system.
R8's key features include:
- Code Shrinking: R8 analyzes the code and removes unused classes, methods, and resources to reduce the size of the application. It uses sophisticated static analysis techniques to determine which parts of the code are actually used.
- Optimization: Similar to ProGuard, R8 performs code-level optimizations like inlining methods, removing dead code, and optimizing resource references to improve the app's performance.
- Minification: R8 renames classes, methods, and fields in the code to obfuscate it, making it harder for reverse engineers to understand and modify the code.
To enable R8, you need to use the Android Gradle Plugin version 3.4 or higher, as it is the default code shrinker in these versions. R8 is automatically enabled when you build a release version of your app, and it replaces ProGuard for code shrinking and obfuscation.
Both ProGuard and R8 are powerful tools for code optimization and obfuscation in Android apps. They help reduce the app's size, improve performance, and make it more difficult for attackers to reverse engineer or tamper with the code. The choice between ProGuard and R8 depends on the Android Gradle Plugin version you’re using, but both tools serve the same purpose of compressing and optimizing code in release builds.
Apply for remote Kotlin developer jobs at EPAM Anywhere
Experience the freedom of remote work with our remote Kotlin jobs while fueling your passion for software engineering at EPAM Anywhere. Seize the opportunity to join a dynamic global team of talented professionals and apply your Kotlin expertise to groundbreaking projects from the comfort of your home.
EPAM Anywhere offers a flexible work environment, empowering you to achieve a healthy work-life balance and collaborate with industry-leading experts. With EPAM's commitment to continuous learning and career growth, you'll have access to cutting-edge technologies and professional development programs that will propel your Kotlin skills to new heights.
ready to make your next career move?
Send us your CV and we'll get back to you with a matching remote Kotlin job at EPAM Anywhere

With 5+ years of software development experience, I specialize in cross-stack development with React Native, Angular, and NestJS as well as presales PoC development. I'm an EPAM University coordinator and develop React training programs. I like sharing my experience to make the learning process easier for future developers.
With 5+ years of software development experience, I specialize in cross-stack development with React Native, Angular, and NestJS as well as presales PoC development. I'm an EPAM University coordinator and develop React training programs. I like sharing my experience to make the learning process easier for future developers.
Explore our Editorial Policy to learn more about our standards for content creation.
read more


